I hope you are all following the PaperArtsy blog his week (and always!) for some great stamping and mixed media inspiration ... as promised here is my second project using some of the Chatsworth Collection paper scraps left over from my mini album which featured two nights ago ... this is a project I came up with a while ago for a swap and it makes a lovely gift for a 'crafty' friend ...
You could substitute the button card for a
small envelope to hold a gift card – actually there is room in the pocket for
both. I have added an optional charm on the side using a Tim Holtz hinge clip.
The back is a piece of sturdy cardstock 6”
x 4” covered on both sides with papers from the Chatsworth Collection. The
button card is 3” x 5” and is also covered with paper on both sides. Corners
are rounded and the edges distressed with Walnut Stain Distress Ink. The pocket
is made using paper that measures 5” x 3” – I have scored 3 sides at ½” and
then used a plate to cut the unscored edge slightly curved. The ½” tabs are
turned in, bottom corners rounded and then lace is glued to top edge before distressing
edges and gluing pocket to card.
I made the flowers dimensional. After die
cutting using the Paperartsy Grunge Flowers die in the smaller 2 sizes the petals
are snipped towards the centre …
Then the back of each petal is gently
‘rounded and shaped’ using a ball tool. The red inner flower is a punch. I’ve
added pearl centres, die cut leaves and a bit of glitter.
The buttons are made from a Marianne die. I
have cut 4 layers of card and 1 from the paper for each button and glued them
together – the top paper layer has been stamped with the script stamp from
LPC014, the edges distressed with Black Soot Distress Ink and then a thick
layer of Glossy Accents added on top. The card they are tied to has been
decorated with stamps from Ink and the Dog Buttons Plates 2 and 4.
Below are more photographs from the mini album and a link at the bottom to my Youtube video showing the project ... thank you for reading, watching and commenting - it is really appreciated.
Woohoo .. I got lucky and was picked out of a hat to be one of tonight's PaperArtsy bloggers ... here is a little snippet photograph of my project so head on over to PaperArtsy blog see the rest and the other two gorgeous projects on there ... you gotta love PaperArtsy ... fab products and brilliant blog inspiration almost every day ...
I got a bit carried away and made a second project ... if you head back here tomorrow I'll have more pictures of the above, the second project and a link to a video showing the above in a bit more detail ... see you then
This weeks Ink on my Fingers challenge is 'memories' ... my tag is in memory of my Nan (maternal grandmother) ... I have used scribble stain distress technique for the background (2nd technique in Compendium of Curiosities Book 1), flowers made from similarly stained paper and die cut with Spellbinders Rose creations die, some leaves (Memory Box die)' and a frame made by layering up Oval die cuts and embossing with copper embossing powder ...
The words, embellishments and charms all relate to things about her ..
Sewing words and phrases, doily lace stencil resembling the crochet she used to do, she liked a bit of bling, she loved flowers, she always had a pot of tea on the go, she could always find a safety pin when you needed one' and she was clever (the book charm) - she passed her exams to attend Grammer School in 1911 but her parents couldn't afford for her to go - her head mistress even offered to fund her uniform but it was still too much money and she never got there - her mother then died when she was 13 and she went into 'service' for her cousin who seems to have managed to marry 'well' ... this is a photograph of my Nan with her young charge aged about 14 ...
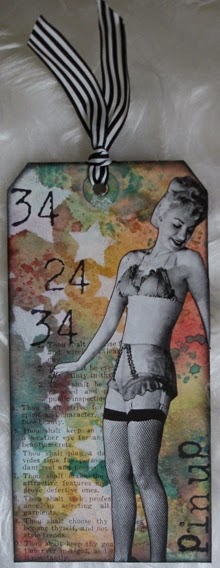
The latest challenge from Tag Along is 'Pin Up' ... here's my version ...
Wrinkle free distress background (I just Got Compendium of Curiosities 1 - I know - years behind :-)) - and I have used wrinkle free before of course but thought I might work through the book. PaperArtsy Fresco Finish paint in Snowflake through a star stencil from Dutch Doobadoo. The text is in Potting Soil Archival and is an old Rubber Baby Buggy Bumpers stamp and is instructions on how to take care of yourself in terms of beauty! The numbers and title are a Stampington Alphabet and are stamped in black archival. Black soot around the edge and a bit of silky striped ribbon to finish it off.
I wasn't at all happy with my first entry into this challenge and wanted to try again ... I have really loved Pam Thorburn's posts this week and wanted to carry on Gelli printing ... I don't 'scrapbook' but I do 'junk journal' and often use photographs ... usually I use patterned papers as backgrounds but Pam and a recent Gelli Arts video inspired me to try making my own ... I used PaperArtsy Fresco Finish paints in Guacamole, Claret and Snowflake and stamps from Plate ELB01 to make the pattern ... it turned out really well ...
When I started the page I had in mind the photograph I wanted to use which was a black and white one of my Dad chopping down a very large tree ... while I was looking for that photograph I found this one and the colours were just perfect (there's even some Guacamole coloured green moss on the rocks at the back) ... I love how that kind of thing happens when you work through a project!
The prints I started off with are below ... the first yellow one didn't work and the sheet on the left is where I brayered off my paint. I then tore some strips from this to make the paper ruffle which picks up the (very stylish!) ruched swimwear. I stamped the leaves from ELB01 onto off cuts from the original print to embellish the page ... and found some ribbon with a bit of sparkle ... all very simple. Oh yes I'm the one on the right - in orange - never worn this colour since!
Below are a few junk journal pages made some time ago in a similar style ... just trying stuff out and recording a little about the photograph/event.